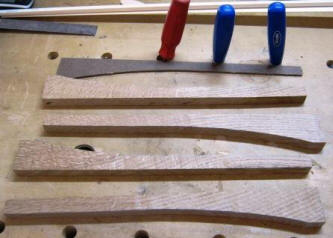
I suppose I could have assembled the chair sides
using all mortise-and-tenon joinery. Undoubtedly, that was the way Gus
Stickley and his brothers did a hundred years ago. However, the slats in
the sides of the chair are not load-bearing, and cutting sixteen
mortises and tenons would be very time-consuming, so I decided to use
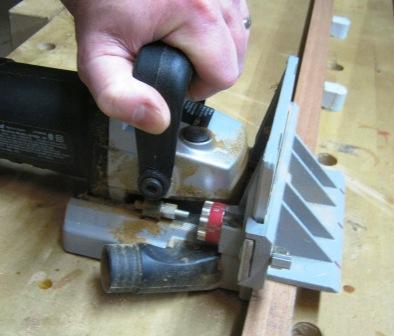
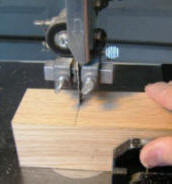
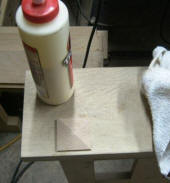
biscuits instead.If you're a fan of
Norm Abrams, you've seen this technique before. Biscuits are oval-shaped
pieces of beech wood. Using a specialized biscuit saw (left), I cut
slots into both sides of the wood I want to join. When the biscuits
are glued into the slots, they swell, creating a permanent joint.
RICK
BUILDS A MORRIS CHAIR
PART IV: PUTTING IT ALL TOGETHER!
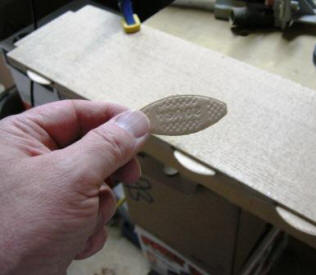
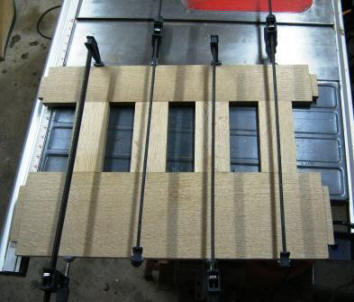
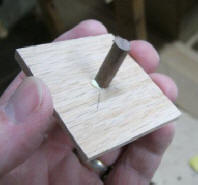
This is a biscuit. They come in all sizes--in this
case I'm using a #20 to join the top and bottom stretchers of the chair
sides with the vertical slats.
As you can see, I've fitted the biscuits in the top
stretcher in the picture background. Always fit pieces together before
gluing!
Some people may think that using biscuits instead
of mortises and tenons here is a cheat. Hey, a biscuit is just a faux tenon,
and the slots are sort of a mortise--it's just a twenty-first century
improvement on an ancient joinery method!
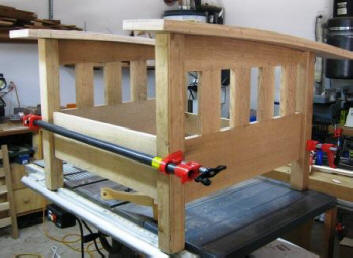
Here is the left side of the chair, glued and clamped.
I really love these new bar clamps. In previous projects, I used Irwin-style
pistol grip squeeze bar clamps, but I found they didn't give me enough oomph
to hold pieces together tightly.
These clamps use a screw tightener which exerts a
lot more pressure on the workpiece, resulting in a tighter joint. Also, I
found out that I can buy them for about four bucks apiece at Harbor Freight.
After the glue dried, I drilled both sides of each
biscuit joint for walnut dowels to lock the joints together permanently.
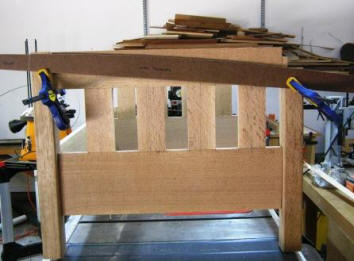
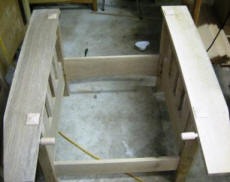
Here, I've done a test-fit of the entire chair frame
after completing both sides. Remember that this is a bowed-arm chair, but
the chair sides are squared. In order to install the arms, I have to saw the
chair sides with a similar bowed arc. To do this, I made a hardwood template
from the actual arm, and then I clamped it to the side of the chair and
marked my cut line.
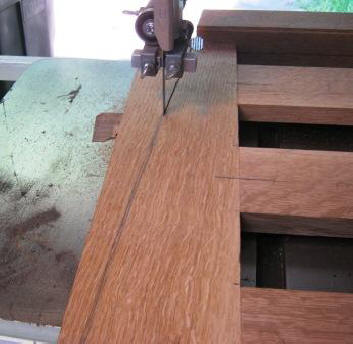
Next, I saw the bowed shape using my bandsaw. This is
a little tricky. As you can see, the chair side isn't flat. The legs are
proud of the sides, which means that, at one point, the side drops off the
saw table, and then has to be raised again at the end of the cut. This could
result in a cut that isn't flat. After I finished this operation. I was able
to flatten the cut using a block plane and a finish sander.
Another test fit. The arms aren't actually attached at
this point--they're just lying on top of the chair sides. I've attached the
sides with the front and back stretchers, but I haven't glued anything yet.
Also, it's hard to see in this picture, but I drilled pin holes at each of
the biscuit joints on the chair sides and pinned the biscuits with
quarter-in walnut dowels. My goal with this chair is to built the entire
frame without a single nail or screw. Because of that, every mortise and
tenon joint has to be pinned with a dowel, to assure that the joints will
never open. While the chair is clamped here, I drilled all the other tenon
joints to pin later.
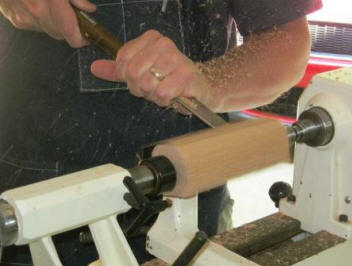
This Morris chair design is a recliner. The back of
the chair is held to the frame using swivel pegs inserted into the legs, and
the angle of the chair back is controlled using pegs inserted into the sides
of the arms. I made the pegs on my Jet mini-lathe. This is a tool I usually
use to make pens and bottle stoppers. I have a larger Craftsman wood lathe,
but I prefer to use the Jet because it's easier to move around. Here, I've
cut a 2" x 2" x 6" length of red oak, and I'm beginning to turn the first
peg.
Woodturning is really a lot of fun, as you slowly
see the shape of the piece you're turning emerge from the wood.
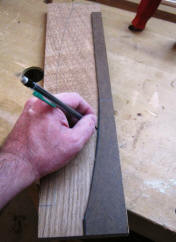
Another feature of Arts and Crafts furniture is
corbels used to support the arms. I use four corbels on this chair. Here, I
mark the wood using a template I made from the plans. In the second picture
are the four corbels after they're bandsawed. I'll sand them and drill three
holes in each one for walnut pins that will hold them to the chair legs.
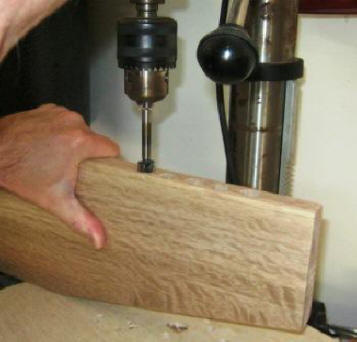
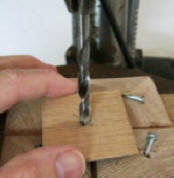
In this picture, I'm using my drill press and a 5/8"
forstner bit to drill the holes in the arm to accept the pegs that support
the chair back.
This picture is actually a re-creation. I actually
drilled the holes before sawing the angle in the back of the arm, but I
forgot to take a picture at the time. I had Elaine take this picture later,
as I pretended to drill the holes.
This is a terrifying operation. I had no way to
assure that the arm was absolutely square to the drill press table, and the
holes are about three inches deep. If the arm isn't square, I run the risk
of drilling through either the top or bottom of the arm, which would ruin
it. Fortunately, I completed all ten holes (five in each arm) without
incident. Another disaster averted!
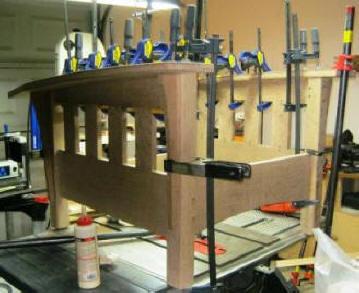
Finally, it's time to glue and pin the arms in place!
After many test-fittings, I pull out a ton of clamps and put it all
together. The corbels are clamped in place to help keep the arms level, but
they aren't glued yet--I still have to do some drilling and shaping with
them. Also, you may notice that I sawed an arch on the bottom of the front
stretcher before gluing the frame together, in keeping with classic Stickley
style.
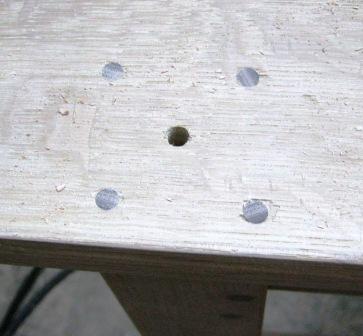
Before the arms were glued in place, I marked the
underside for quarter-inch walnut pins, and drilled holes for them on the
drill press. After I glue the arms in place, I go back and drill into the
chair sides and legs, and pound in the walnut pins. Since the arms are
bowed, the pins go into the chair frame at different angles, locking the arm
to the frame. Here are the dowel pins over one of the legs. Notice that the
center hole is still open? That's because I still need to install faux
tenons over each leg.
Back in the days before quadrilinear legs, Gus
Stickley would craft solid legs, and fashion through tenons in the top of
them that would project through the arm.
I used quadrilinear legs on this chair, in order to
present a quartersawn face on all four sides of each leg. I couldn't make a
through tenon with these legs, because if I had the tenon would display the
joinery and an empty space in the middle. Also, through tenons have the
problem of being end grain, which is difficult to smooth and is not as
attractive as the long grain on the rest of the chair. So, in order to
preserve the classic Stickley style, it was necessary to make faux through
tenons.
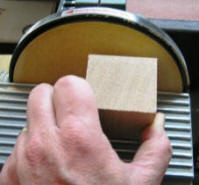
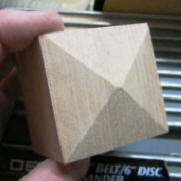
Here is a photo-essay of the process for making the
faux tenons. First, I cut a two-inch square from the the same red oak stock
I used to make the chair pegs. I pull out my 4" belt sander and attach the
sanding fence to the sanding disk, and set the angle of the fence to 15
degrees. I mark the midlines on the long grain face of the square, and sand
the first two sides to that midline--that leaves the "roof" angle on the
square. Then I sand the other two sides, again to the midline, which gives
me a 15 degree pyramid. I do the same thing on the opposite end of the
square, because I don't want to waste wood if I can avoid it.
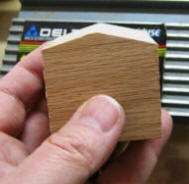
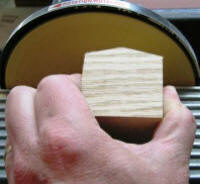
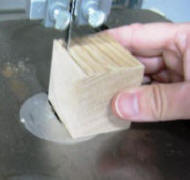
The next step is to saw off the pyramid about a
quarter inch from the bottom, using my bandsaw. I mark the centerpoint on
the faux tenon bottom, and drill a shallow quarter inch hole at that point.
This hole will eventually hold a walnut dowel.
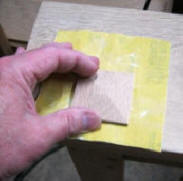
Remember the arms are bowed? That means they aren't
flat, so the faux tenons have to be shaped to lie flush with the surface of
the arm. I do this the same way we flush mount a guitar bridge to a guitar
soundboard. I place a piece of 220 grit sandpaper over the part of the arm
where the tenon will be mounted, and sand across the arm to form a dish on
the bottom of the tenon. When that's done, I glue a short length of
quarter-inch walnut dowel in the hole in the bottom of the tenon, and then
gently tap it into place on the chair arm. In the last picture, you can see
that all four faux tenons have been installed. You can also see the pegs I
turned to hold the chair back in place.
It's these little details that make the chair look
as nice as anything Gus might have made a hundred years ago.
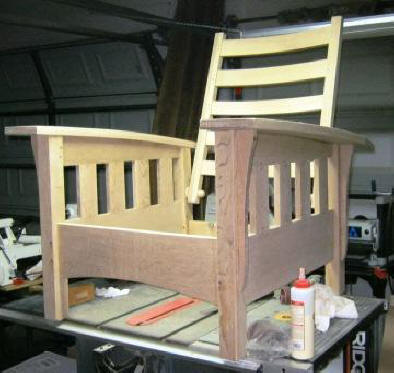
I drilled, glued, and pinned the corbels, and then
finished pinning all the mortise and tenon joints that hold the chair
together. After flush-cutting all the walnut pins, I gave the chair a quick
sanding to 220 grit, and it was time to put the whole thing together!
I think it looks pretty genuine!
At this point, I took it off to the upholsterer to
have the cushions made. I deliberated a lot over what kind of cushions I
wanted. The traditional cushion material is leather, but I've always liked
cloth, and there are a lot of wonderful Arts and Crafts traditional cloth
upholstery patterns out there.
In the end, though, I decided to go with a deep
hunter green leather for the cushions. It will take the upholsterer about
four weeks to make them. Once I get the chair back, I'll wrap up this build
diary by showing how I got the traditional fumed ammonia finish without
asphyxiating myself, by using dyes and stains.