PART 3: MORTISING, TENONING, AND ASSEMBLING THE
FRAME AND BACK
RICK
BUILDS A MORRIS CHAIR
I always have the goal when building
Arts and Crafts furniture to try to build a piece with as little metal as
possible. In order to do this, I have to be able to cut tight mortises and
tenons, and I use a lot of pinned joints with dowels to hold everything
together.
On this page, I'll show how I do the
joinery and assemble the frame and back of the chair, using mostly mortises
and tenons, and pinned joints.
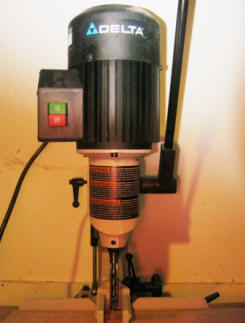
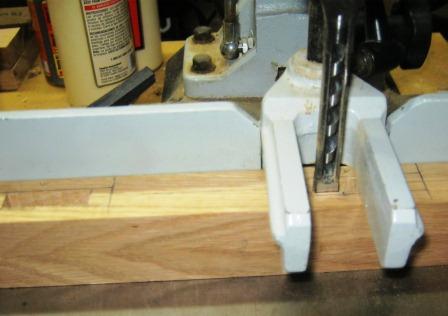
Here's a pretty cool tool. This is a Delta dedicated
bench mortiser. I've wanted one of these for some time. I already owned a
cheap Chinese mortising attachment for my drill press, but it isn't as efficient or
as easy to use as this tool. This mortiser is built to do one job and one job
only--to punch good straight mortises in wood.
It's basically a drill press, but with a two-part bit.
The inner bit is a coarse auger, and the outer section is four-sided chisel.
The inner bit drills a hole, and the outer chisel bit carves square sides to
the hole.
I could form the mortises by drilling the holes
with a Forstner bit and then forming the square sides with a chisel and
mallet, but this is easier and faster. The old way might take me
fifteen minutes per mortise. With this tool, I do it in about a minute and a
half.
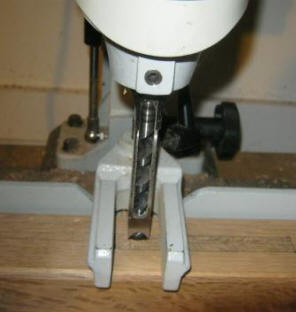
Here, I'm cutting the first mortise in a rear leg of
the chair. First, though, I draw a midline down the center of the leg, which
I use to assure that each of the mortises are correctly lined up when I do
the assembly. Then, using the plans, I mark the outlines of the mortises
themselves, to guide the cutting.
The hallmark of Arts and Crafts furniture-making is
mortise and tenon joinery. On this chair alone, there are over thirty-five
mortises to cut. I'll spare you the drudgery.
Here, I've finished the mortises on the two rear legs.
Took me about ten minutes total. I did all four legs in about a half hour.
Doing it the old fashioned way with spoon bits and chisels would have taken
two or three hours easy.Once I've cut
all the mortises in the legs, the next step is to begin cutting the tenons
on the stretchers that with will hold the legs together. There's a special
tool for that, too!
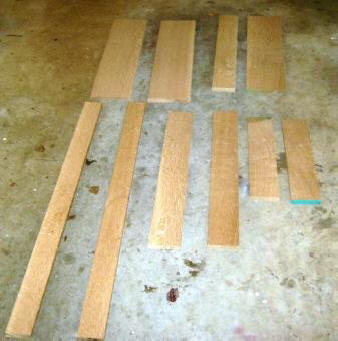
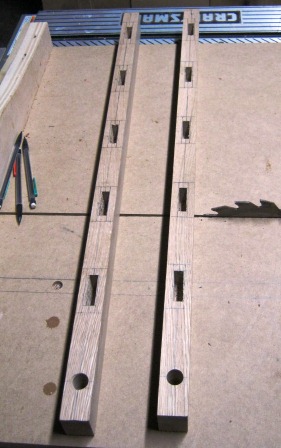
Here are the other parts of the main frame of the
chair: the front and back stretchers (top right); the bottom side stretchers
(top left); the top side stretchers (center bottom); the two long pieces
will be cut into 8 seven-inch long side slats; and the two short pieces on
the bottom right will become the front and rear corbels. All of them have
been dimensioned on the planer to exactly three-quarters an inch thick.
With the exception of the corbels, every piece will
get tenons on both ends. The side slats will get quarter-inch wide tenons.
Everything else gets half-inch tenons.
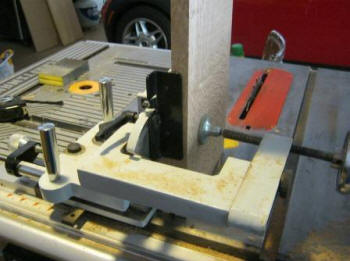
If you watch New Yankee Workshop, you've
probably seen Norm Abrams use one of these babies. This is a tenoning jig
for the table saw. It's dandy for cutting very precise cheeks on wide tenons, as I'm doing here with the front stretcher. The jig has a bar that
rides in the miter slot of the saw, which keeps the entire contraption
parallel with the saw blade. A clamp and backplate holds the piece upright
and square, and an adjusting screw allows me to adjust the depth of cut.
After I cut one tenon cheek, I turn the piece around and cut the cheek on
the other side. The best thing about this jig is that it makes cutting tenons very safe--my hand never gets near the saw blade.
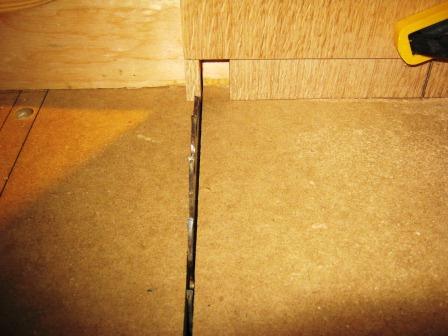
Here is the result. The tenoning jig makes a very
clean shoulder cut, which you can see here as a step in the plane of the
board.
Now that I've cut the tenon cheeks, the next
chore is to cut the tenon shoulders. We cut the shoulders and cheeks
because--even using the dedicated mortiser--long mortises can still look
pretty rough. The cheeks and tenons provide a clean visual connection
between the two pieces being joined, by hiding any imperfections in the
mortis cut.
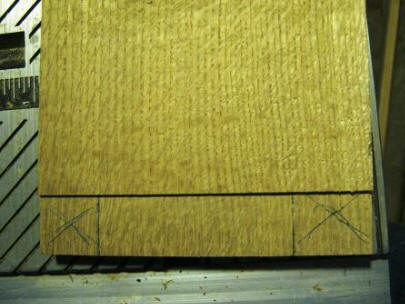
Here, I've marked out the areas which will be cut
away to form the tenons, represented by the big X marks.
There are lots of ways to cut the shoulders on the tenons.
The easiest way is to use the bandsaw. However, it is possible to get
over-ambitious with the bandsaw and cut into the tenon itself, or overcut
the tenon shoulder which wouldn't give you a very pretty joint. You could
also use a handsaw, or--better yet-- a dozuki dovetail saw. You could, if
you were so inclined, cut them with a good sharp chisel.
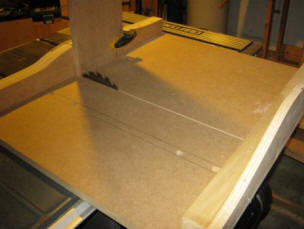
In this case, I'll be using the table saw, fitted
with my homebuilt crosscut sled. This sled, like the tenoning jig, is
attached to a bar that rides in the miter slot on the saw, which keeps the
sled in the same place for each cut. After cutting a kerf in the sled, I
attached a backboard that was perfectly square (at a precise 90 degree
angle) to the saw blade. While this sled is typically used to make precisely
square cross cuts in lumber, I can also use it for cutting tenon shoulders.
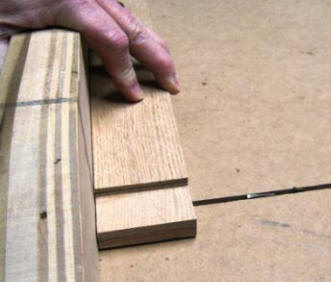
Using a shop square, I mount the workpiece
vertically to the backing place with a clamp (picture on the right, above).
I line up the vertical line of the shoulder with the blade kerf on the sled,
and then set my blade height to just below the horizontal line. I slowly
"sneak up" on the horizontal line using several passes through the blade,
adjusting the blade height each time, until the cut is exactly on the
horizontal line. Then, using multiple passes, I nibble away at the board, to
cut out the waste. This way, the bottom of the cut is perfectly flat.
I could do this with a dado blade, which would also
produce a flat bottomed cut, but in the time it would take to mount the
blade and set the height, I can have these cuts done using the nibbling
method.
That's one shoulder cut, and only twenty-three to go!
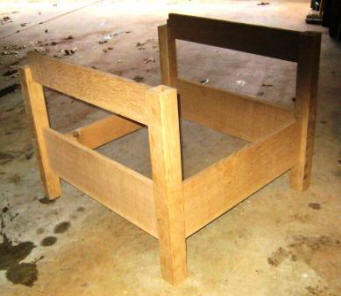
Here, after cutting all the mortises and tenons, I've
fitted the entire main chair frame together.
If I've done a good job of cutting the mortises and
tenons, they should fit just tightly enough for the unit to stand freely
without falling apart. Looks like a good job to me!
Of course, we're still a long way from gluing and
pinning the frame together. I still need to fit the interstitial slats and
the bowed arms, drill holes
for the pins, and do some fine tuning.
First, though, it's time to put together the back
of the chair.
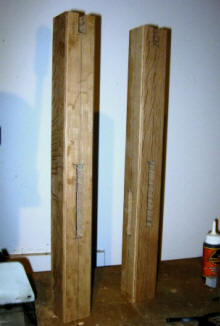
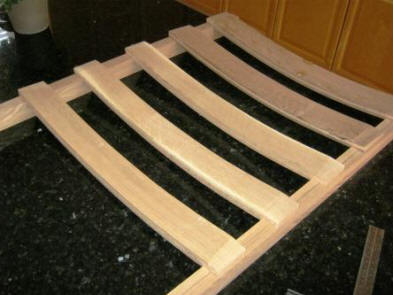
I assembled the curved slats for the back some time
ago, but now I need to make the stiles (or uprights).
One way is to make them out of 8/4 quartersawn
white oak. 8/4 (about two inches thick) is kind of hard to come by, and
somewhat expensive to boot, so I'll make the stiles by laminating two sticks
of 4/4.
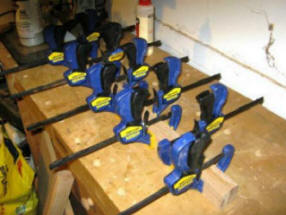
Here, I've glued and clamped them together.
After unclamping, I run the stiles through the planer
to get them to nominal thickness, as indicated by the plans.
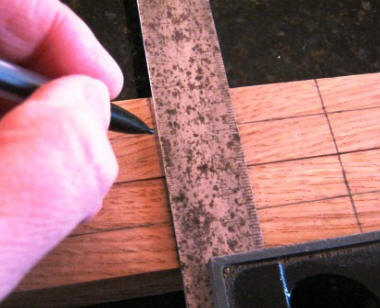
Now it's time to do the layout. I take the slats
that I made earlier, and put them in place on the stiles.
At this point, the slat tenons are still full-width.
I'll finish them later, but they're fine for now.
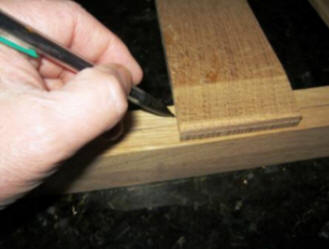
Here, I'm marking the spots for the mortises I'll
cut to receive the tenons.
Here, I'm marking the actual mortise slots. I'll be
taking about a quarter inch off each side of the tenons, so I don't want to
cut the mortises the full width of the slats.
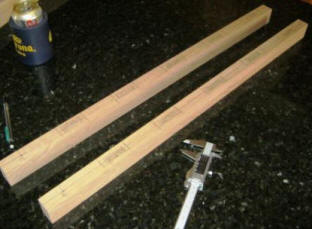
Here are the stiles after I finish marking them up.
I've also located the spots (bottom left) where I'll be boring the holes for
the pins that will attach the chair back to the chair body.
Using a 5/8" Forstner bit, I'm boring the pin holes in
the stiles. This is pretty slow going, because the Forstner bit has a lot of
friction area, and the white oak is pretty stringy. The bit tends to grab if
I don't clear the bore hole frequently.
I've put a piece of waste white oak under the stile
to prevent tear-out, and to keep the bit from going all the way through the
stile into nothing but air. If it does that, it could grab the stile and
send it spinning like a baseball bat.
Don't ask me how I know this.
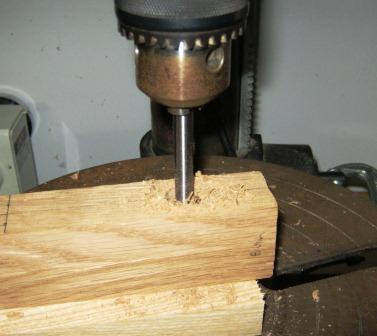
Now I use the benchtop mortiser to cut the mortises
themselves.
By now, I'm getting pretty good at this!
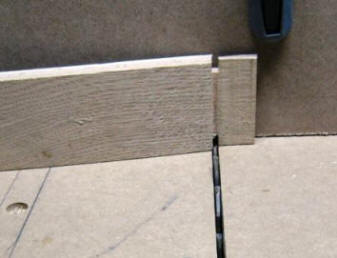
Here are the finished stiles, with the mortises cut
and the pin holes bored.
Now it's time to fit the slats.
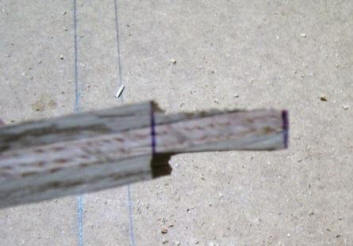
Here is one of the slats I laminated some time back.
Note that I've only indented one cheek of the tenon. Now it's time to finish
cutting the tenons, so that I won't have any gaps in the mortise on the seat
back stiles.
Well, actually, it's so that I'll have minimal
gaps there. Want to be completely honest, after all!
I start by cutting the front cheeks. To do this, I use
the crosscut sled on my table saw. I set the blade height to 1/4 inch, and
then I locate the slat so that the blade is precisely perpendicular to the
original cheek I cut earlier. From there, it's simply a matter of making the
initial cut, and then nibbling away the rest of the cheek.
Here are the finished cheeks. I know the tenon looks
curved, but that's because the grain of the wood is running diagonal to the
tenon itself, so it's an optical illusion. Trust me. It's straight.
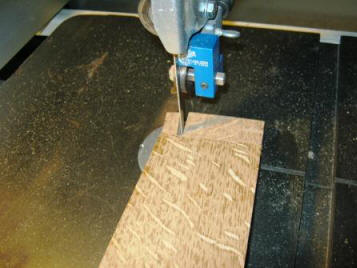
Now it's time to cut the tenon shoulders. I don't even
need to adjust the blade, since I'll be removing a quarter inch from the
shoulders. Again, I use the crosscut sled to make the initial cuts.
Once I've made the initial cuts. I just finish the
tenons on the bandsaw.
Why, yes, this IS almost exactly the opposite of
the way I did the tenon shoulders on the main frame tenons. Thank you for
noticing.
Sometimes, you just gotta mix things up. Keeps the
process interesting.
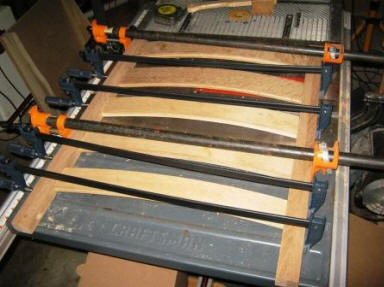
And, finally, after cutting nine more tenons, it's
time to glue and clamp! This is the best part--when you get to see how the
whole thing comes together!