PART 2
Preparing the Back and Side Plates
There are a number of steps between
buying a piece of lumber, and turning that wood into a guitar.
The sapele that I bought was
quarter-sawn, which means that it was purposefully cut in the sawmill
with the grain running completely vertical. As opposed to traditional
lumber preparation, in which the log is rift sawn to produce the maximum
number of boards, quartersawing does involve some careful planning, and
more time to produce the lumber. The resulting pieces, however, are much
more stable and less prone to warping and twisting than rift-sawn wood.
While it is possible to build a
guitar with rift-sawn wood, I try to use quartersawn plates whenever I
can. The resulting instrument will be more likely to last way beyond my
lifetime.

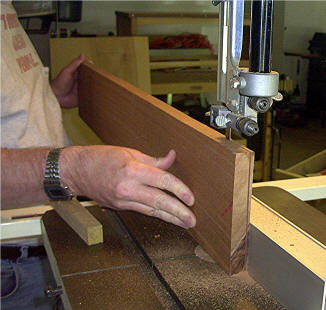
Far and away, the best tool purchase
I've made over the last several years has been my Jet 14-inch bandsaw. With
a 12-inch riser block attached, I can resaw just about any board out there.
Resawing is the process - as you can
see in this picture - of taking one relatively thick (about 13/16 inch)
board, and sawing it into sections, or plates, each a little thinner than a
quarter inch.
I use a Woodcraft Timberwolf blade,
which tends to make things much easier.
In this picture, I am resawing one of
the future sides to my guitar. After that, I will also produce two plates
that will be joined to become the back of the guitar.
By the way, it's hard to see the
writing on my tee shirt in many of these pictures, but it says I
WRITE DEAD PEOPLE on the front, and has pictures of my books on the
back.
I am not above becoming a walking
billboard for my published works!
Of course, even after resawing, the plates are going to
be way too thick. The average guitar side is about .090" (about 2.3mm)
thick, and the typical guitar back is between .100" and .110" (2.8mm)
thick.
When it is properly thinned, a guitar side can often
be flexed quite easily. Getting it to bend and hold a shape, however, takes
some work, which I'll detail in a future page.
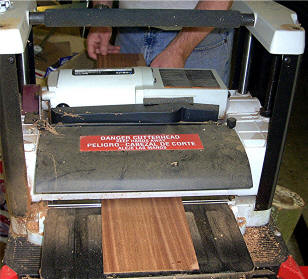
To begin the thinning process, I use my Delta portable
planer. This is a very dangerous tool, and you can be certain that I'm
extremely careful with it. Inside is a drum with two incredibly sharp knife
blades rotating at something like 10,000 rpm.
I can adjust the height using a
crank on top of the machine. I take off about a tenth of an inch with
each pass, until I'm within two or three tenths of my desired thickness.
The thinner you get your piece, however, the more careful you have to
be. I've played the odds too closely on more than one occasion, and this
little baby has turned my resawn piece into toothpicks and splinters.
There are other ways to thin your
stock, of course. The most popular way is to use a hand plane with a
toothed blade, planing in first one direction and then another, then
change to a smoothing blade to erase the tooth marks, and finally finish
the job with hand scrapers. This is the traditional method, and is
detailed very nicely in Cumpiano and Natelson's book Guitarmaking:
Tradition and Technology.
I've done it both ways, and I
really prefer using the power planer. It's faster, and the resulting
piece has a much more uniform thickness. Stradivari would frown, of
course, if he weren't dead, but I bet he'd have used one of these babies
if they'd been around in the seventeenth century!
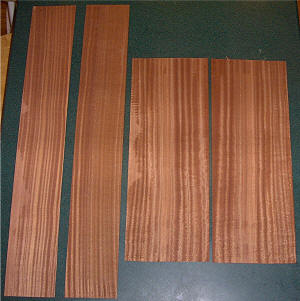
Here are the plates after they have been run through the
portable planer. The eventual side pieces have been planed down to about
.110" (2.7mm). The plates for the back are currently at about .135" (3.4mm).
I've thinned them about as much as I dare with the
planer.
When you resaw thick boards like I've done, and then
lay the resawn pieces side by side, you get pieces that are said to be
bookmatched because they open like the pages of a book. When the two
pieces are joined, as the two on the right will be to make the guitar back,
you get virtually identical grain on either side of the center seam. This is
aesthetically pleasing, and also separates guitars made from solid wood from
those made out of laminates.
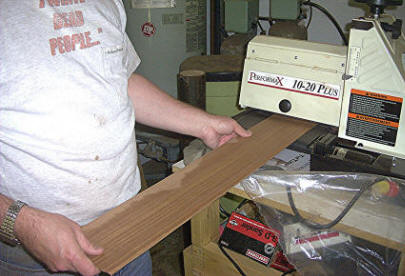
In the picture to the right, I'm beginning the sanding
and final thinning process, using my second favorite major tool, a Performax
thickness sander. Inside this little beauty is an eight-inch sanding drum
covered with 60 grit paper. the sandpaper on the platen holds the workpiece
and keeps it from being spit back out of the sander.
I can adjust the drum height almost infinitely with
the wheel on top of the sander, so I can take off wood literally the
thickness of a hair if I want.
I run each piece through repeatedly, until I get
within several thousandths of my desired thickness - around .095" for the
sides, and about .115" for the back plates.
Before I glue the two halves of the
back together to make a single plate, I need to join them. Joining is the
process of planing the two sides to be glued to the point that they are as
close to flat as possible. Ideally, when you hold the jointed halves
together, you should not be able to see any sunlight through the seam -
before gluing!
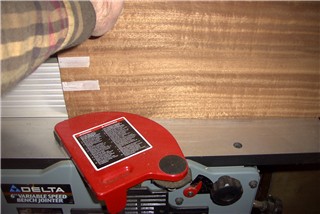
There are lots of ways to do this. Some
people use a long jack plane and a shooting board. I even know some people
who use a flat piece of plate glass and fine grain sandpaper. I prefer to
use my Delta Variable Speed Bench Jointer. Like many of the tools in my
shop, this is a very dangerous piece of equipment. In the picture above,
I've taped the two halves of the back together, and I'm running them over
the 10,000 RPM knives rotating under the flat bed of the jointer. The red
finger guard likes to believe that it is protecting me, but I know better. I
keep my fingers well away from the business end of this tool.
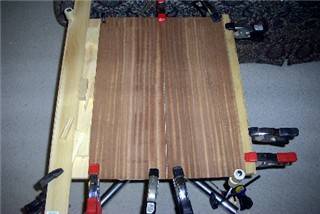
After two or three passes, the joint is
pretty clean. It's time to glue!
This is my joining board. It's very
simple. I clamp two straight edges on either side of the board. Then I place
the two halves of the back to be joined between them. I use wedges on the
left side of the board to provide the clamping pressure.
Long-time luthiers will claim that - if
you've properly jointed the two halves - no clamps should be required. Call
me cautious, I guess. I don't use a lot of clamping pressure - just enough
to assure that the joint is closed.