RICK HELMS WOODWORKING
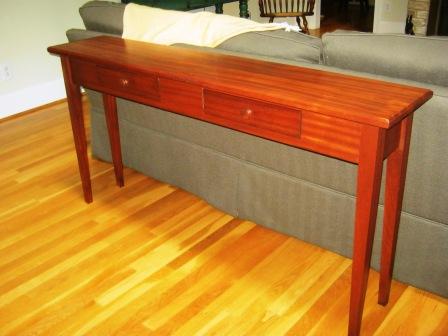
SHAKER LIBRARY TABLE
A few months after I finished building the
Morris Chair (see the build diary elsewhere
on this site), Elaine said she'd love to have a library table behind the
couch in our den--someplace to put another lamp so she could read from her
end of the couch, and a place to put things like books, magazines, and the
endless remote controls. I thought she intended to shop for one, but soon it
became obvious that she meant I should build one. Hey, I figured,
why
not?
Compared to building a complex project like a
Morris Chair, which took me almost a year to complete working a few hours on
weekends and required several specialized bending forms and literally dozens
of mortises and tenons, a library table is actually a pretty easy project. I
figured it would take about thirty hours. I have built tables before,
including the one I write at in my home office, and the one I use to hold my
printer there. Tables are straight-forward: four legs, eight mortises and
tenons, four skirt pieces, some poplar braces, and a top. I figured I'd make
this one a little more difficult by adding a couple of dovetailed drawers.
Since most Shaker furniture doesn't use pinned mortises the way Arts and
Crafts furniture does, I was free to use screw and nail fasteners to help
hold it all together. I made some measurements, and dove in!
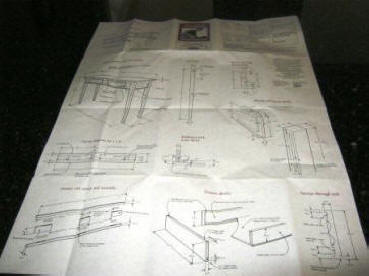
Having built a few tables already, I probably
could have done this one on the fly, but it never hurts to have some plans
to fall back on. As it happened, I already had a set that I ordered almost
twenty years ago from Norm Abrams and New Yankee Workshop--long before I
ever seriously thought about woodworking. The table I intended to build was
five feet long, compared to four feet in the plans, so I had to make some
modifications here and there. Also, his table was eighteen inches deep, and
mine was only going to be one foot deep.
When building a table, I generally start with
the legs. In this case, I decided to build the table out of sapele. I like
using sapele as a substitute for mahogany. Sapele is sometimes called
"African mahogany", but in fact it isn't a true mahogany at all. Mahogany is
in the genus Swietenia, and sapele is in the genus Entandrophragma.
They are both in the family Meliaceae, though, so they are sort
of kissing cousins. Sapele looks, works, and finishes like mahogany, but it
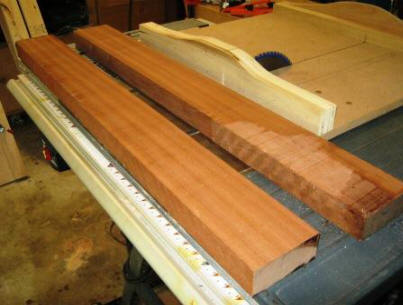
isn't endangered. It's also cheaper. I start out with two pieces about two
and a half inches thick to build the legs.

If you've followed some other projects I've
built, you know that I prefer to start with fairly rough lumber. You can buy
S4S (Sanded on Four Sides) lumber, but it's expensive compared to
rough lumber. I start by smoothing and dimensioning my lumber to rough size
using my thickness planer. As always, I'm very careful with this tool,
because I'm running a piece about five inches thick through, which is plenty
of room for a hand to slip in and get torn to shreds by razor sharp knives
spinning at 10,000 rpm. I keep my hands--and everything else--well clear.

Far and away, the most important tool for
this project (or any table for that matter) will be the table saw. Most of
the major operations will be carried out on it. In this picture, I've set
the fence about two inches from the blade, and I'm ripping the leg stock to
rough width. Note that I'm using two very useful tools--a push stick and a featherboard. The blade sticks up about two and a half inches from the
table, and the push stick keeps my hand far away from it. The featherboard
serves two purposes. First, it holds the workpiece against the rip fence,
giving me a good straight cut. Also, since I am not using a blade guard on
this project, the featherboard prevents kickback.
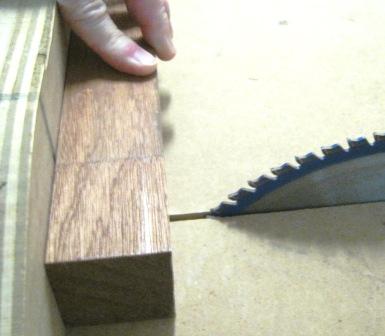
After ripping the legs, I run them through
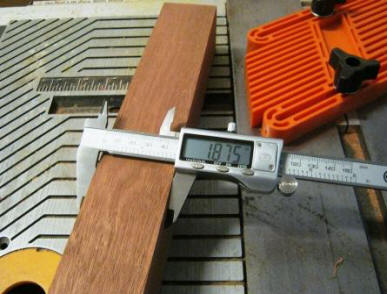
the thickness planer again to get them perfectly square. I decided early on
to make my legs one and 7/8 inches thick, and getting them to just the right
thickness on the planer takes a little finesse with the controls. One and
7/8 inches is the digital equivalent of 1.875 inches. Is the kid good, or
what?
Rick's Woodworking Tips #23: Whenever you use
a small planer, such as the Delta I use, there is a strong chance of getting
snipe on the ends of the pieces you're planing. Snipe is caused when the
blades 'grab' the ends of the workpiece at the beginning and end of the
operation, and cut deeper for two or three inches. Because of that, I
usually cut my rough stock about six inches longer than the nominal lengths
in the plans. Then, using my crosscut sled on the tablesaw, I cut off the
sniped ends, leaving the workpiece the right size from one end to the other.
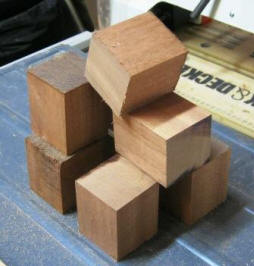
Here are all the cut off sniped ends of the
legs. I won't just toss them, because I hate to waste wood. These are the
perfect size for wood turning on the lathe, to make things like bottle
stoppers and cord pulls, and even the occasional drawer knob, so I'll toss
them into the woodturning stock box. To the right are the legs trimmed to
final length, about 29 inches.
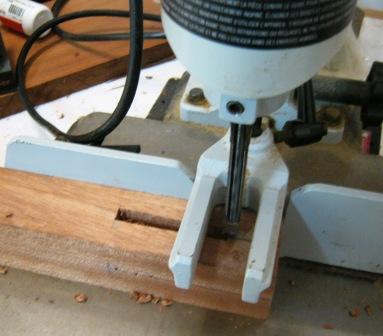
If you've seen my other projects, you're
familiar with this tool already--my Delta dedicated mortiser. This tool
makes cutting mortises quick and easy. There are lots of ways to cut
mortises. The most common way is to drill the center of the mortise with a
spade bit or a Forstner bit, and then chisel the edges of the mortise. The
dedicated mortiser does both operations in a single pass, using a drill bit
surrounded by a square chisel. Either way works great. Using the dedicated
mortiser makes it quicker. I cut two mortises in each leg on facing
sides at the top of the legs. These will hold the front and side skirts of
the table.
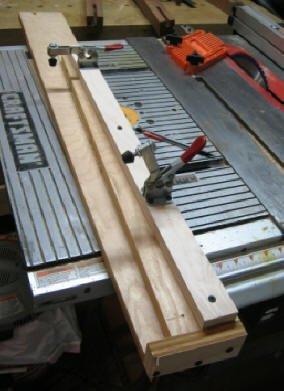
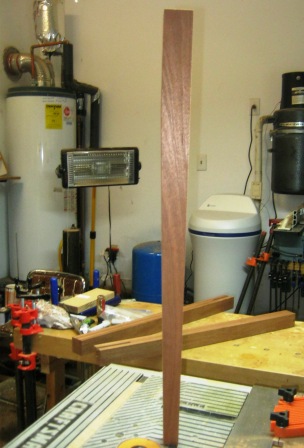
One of the more enjoyable aspects of
woodworking is building tools and jigs for a specialized procedure. I
decided to build this table in the Shaker style, which meant cutting tapered
legs. This is a tapering jig I built from some plywood and poplar scrap I
had lying around the shop, and a couple of toggle clamps I bought from
Woodcraft. This is a pretty simple tool. The right edge of the jig is
straight and square, and rides against the table saw fence. The left side is
angled with a stop block on the bottom, to give me a one inch square bottom
to the leg. I clamp the squared leg into the jig, figure out where I want
the taper to begin near the top of the leg, and then adjust the fence so
that the blade hits the leg at that point. After that, it's just a matter of
running the leg through the blade.
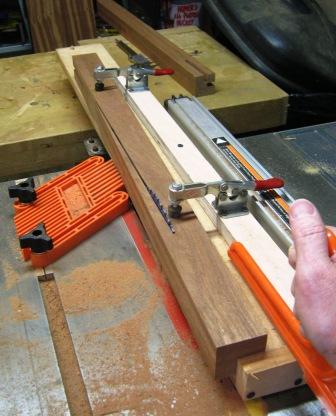
Here, I'm cutting the taper on one of the
legs. The tapers always go on the same faces on which I cut the mortises.
Since the mortises are on facing sides of the leg, there is always a square
face opposite the taper to ride against the angle on the jig. This way, I
get a perfect taper every time.
Note again how I'm using the featherboard
to hold the jig and the workpiece square against the fence, and a push stick
to run the piece through the blade. This is important, because it keeps my
hands well away from the blade. I was born with ten complete fingers, and I
intend to die with ten.
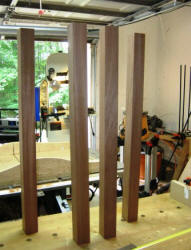
Here's the first completed leg. Only have to
do three more, and I'm ready to move on to the next step.
The total time to build all four legs, including
building the tapering jig, was about three and a half hours. I'll stow away
the tapering jig to use again someday, and building the legs on the next
table will only take a couple of hours total.
Now I can move on to the next step,
building the table top.